Han-Na is currently a full-time Academic Development Tutor at UCB and food and poetry blogger. She started blogging as a way to keep notes on how she adapted recipes and then as she grew in confidence, started to develop her own. Food held so many memories, which she realised whilst living in various countries and without realising, her blog became a way to record them for her.
About 9 months ago, I was asked in an interview, "what do you contribute to a team?" The first thought that popped into my head was brownies. However, perhaps that wouldn't be such a professional way to answer the question? So, instead, I answered something about how I am a really good team player and the many different skills I'd bring to the team, rather than saying that my contribution is a baked sugar high laden with chocolate. I meant to mention my excellent brownies at the end as an aside, but I forgot.
Immediately once the interview was over and as I reflected on how it went, I wished that I had led with the brownies though, because it would have revealed more of my true self. My flatmate and colleague concurred (now assigned to the status of previous flatmate and colleague: that teaching job contract just ended and we've moved out). Though, we then agreed in the next breath that my crack cookies are my best work. So, another time, I'll be that little bit braver, relax and say, "brownies and cookies."
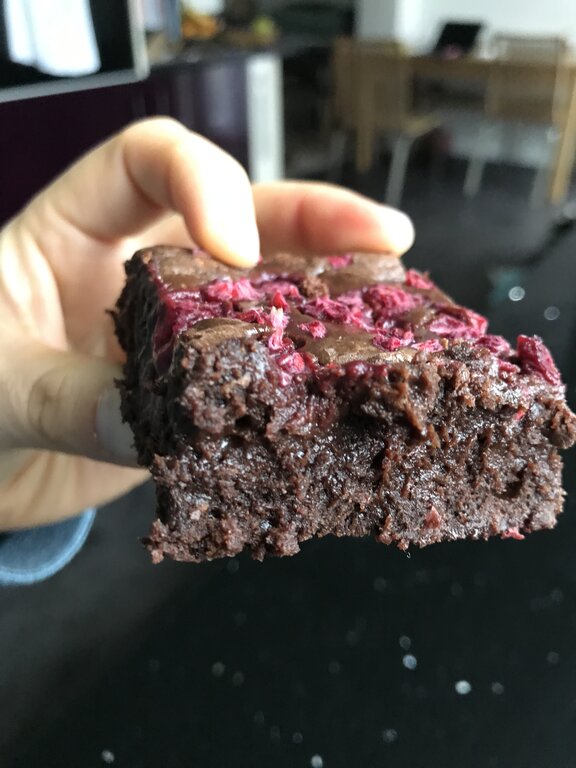
I created this recipe in Cambodia whilst supplying brownies for a cafe because I wanted to create a brownie with more height and volume that I could adapt with a variety of fillings, such as cheesecake and salted caramel. In addition, my usual go-to, very easy brownie recipe (which the raspberry burst brownies are adapted from) suddenly stopped working for me after I upgraded my oven. They were coming out cakier. Some people prefer their brownie consistency like that but I much prefer them to be fudgier with that delightful cracked top. The timing of it might have been purely a coincidence and have nothing to do with me switching from an electric toaster oven to a standing oven cooker. If you've always lived in the UK, then you may have no concept of what I'm talking about. In most parts of S.E Asia, ovens do not come standard in a furnished kitchen. This is the oven in which I began my baking business and I used it for the first 2 years. It only allowed me to do one tray of cookies, a cake or brownies at a time and by the end, it wouldn't heat above 150°C. When I moved and invested in a new oven, it was a game-changer.
Join the Waitlist
Anyway, it gave me an excuse to try out a new brownie making method for me that I'd seen Ed Kimber use in this video in which you mix the eggs and sugar for about 10 minutes until they form into a ribbon stage (I've explained what ribbon stage is in step 4 of the method) and then add the melted chocolate and butter. Mixing the eggs and sugar for that long creates volume and structure and, I deduced, that would help me create that dense fudgy consistency and crinkly top each time. It did. At the bottom of the post I've also included for you a few photos of the different flavours that I've tried with and how I've adapted them.
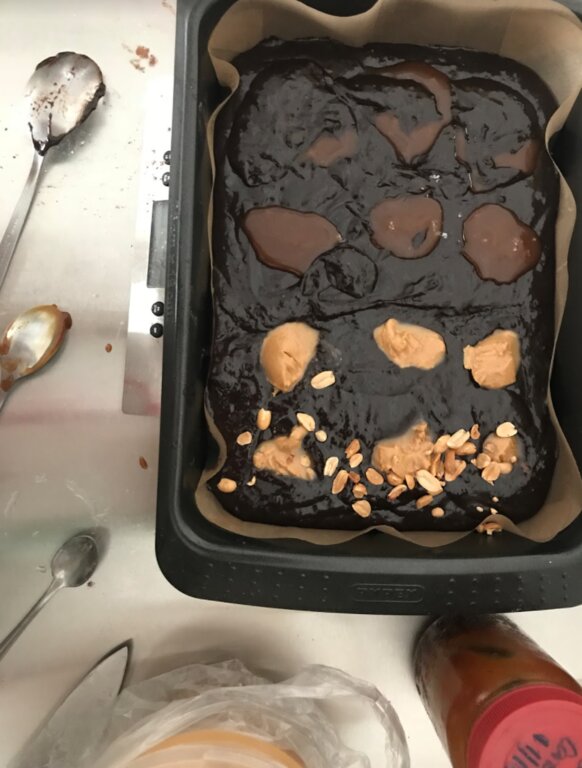
I played around with the sugar quantity. Most brownie recipes ask for larger quantities of sugar, but I've always liked the challenge of seeing how little sugar I can add to baking and have it still taste good. From experience, 150g is too little but anything between 200-230g is perfect. I'll adapt it depending on the additional flavours I want to add. For example, with salted caramel, I use less because of the added sweetness from the caramel. With raspberry, I use more to counteract the tartness of the raspberries.
I prefer to make these in a stand mixer using the whisk attachment because it is easier to leave the stand mixer running during the egg and sugar whisking part whilst getting on with other tasks, rather than holding an electric hand mixer for 10 minutes.
Top Tip 1: If using an electric hand mixer, place a tea towel underneath the bowl to keep it stable and stop it from moving around.
Top tip 2: Once baked, leave these to cool down completely, cover and place in the fridge overnight. Not only will they taste better as the flavours mature and deepen, but they will also be cold. Cut them with a sharp knife and you'll get those beautiful clean lines.
So here's the recipe for the Infinitely Adaptable Fudgy Chocolate Brownies. They'll make between 12-16 brownies or 20 mini brownie bites.
Ingredients
150g unsalted butter, cut into small cubes
150g dark chocolate (at least 60%), broken up, roughly chopped
3 large eggs
200-230g caster sugar (depending on how sweet you'd like them and the additional flavours you want to add)
100g plain flour
20g cocoa powder
1/2 tsp of salt
1 tsp of vanilla extract
1 tsp of instant coffee granules (optional) - I use it because it helps bring out the chocolate flavour
And then whatever flavours* you'd like to add, or not.
Method
Preheat the oven to 180°C/355°F/Gas Mark 4. Line a deep tin. For this quantity, a 20cm square tin or a rectangular 27x20 or 28x18 will work.
-
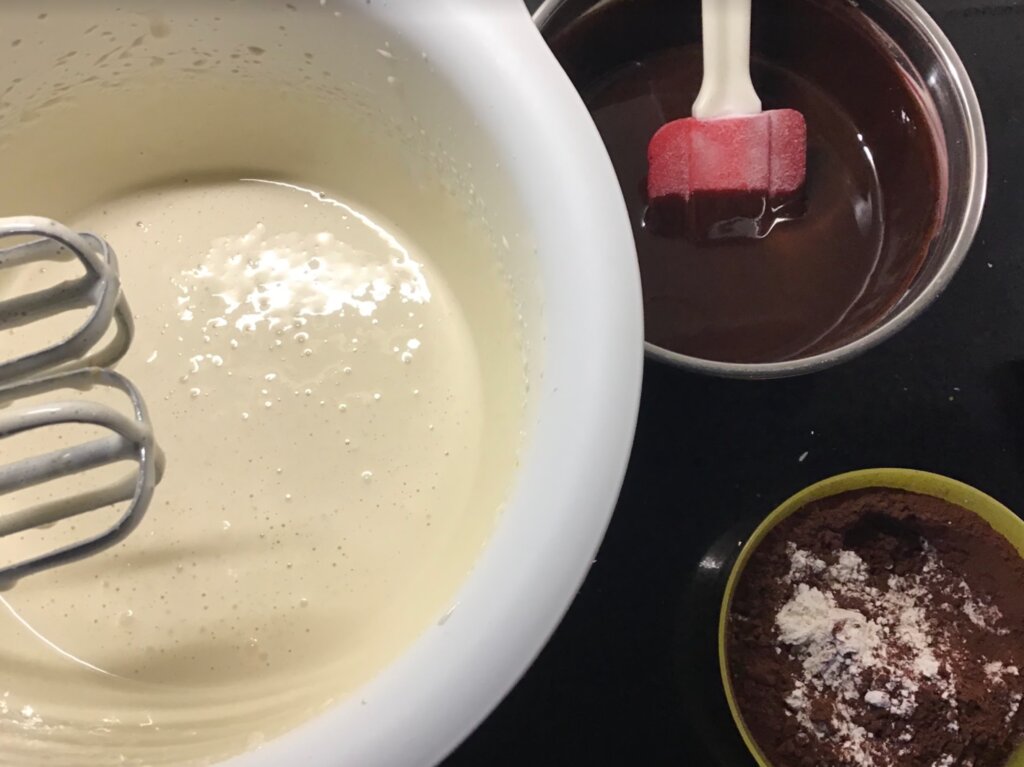
Melt the chocolate and butter together and just after it has melted, add in the salt, vanilla extract and the optional instant coffee granules and leave it on the side to cool down. There are various ways you can melt chocolate and butter.
The more cautious (ahem: proper) approach is to use a bain-marie, which is to put the butter and dark chocolate in a heatproof bowl that can sit on top of a saucepan with simmering water. Make sure that the bottom of the bowl doesn't touch the hot water in the saucepan. Slowly melt the chocolate and stir regularly. This way you won't burn the chocolate.
Another easier way is to use the microwave. Put chocolate and butter in a heatproof bowl, place a paper kitchen towel on top of the bowl so that butter won't pop out as it melts. Melt it in 20-second bursts, stirring each time.
My way is to use a heavy-bottomed saucepan. I put the chocolate and butter in it and melt it at low heat, stirring regularly. I take it off, just as the last few chocolate/butter bits aren't quite melted because they will melt in the residual heat of the saucepan.
In the meantime, measure out the flour and cocoa powder into a small bowl. Sieve it if there are lots of lumps in the flour and cocoa. Otherwise, use a whisk to loosen and mix them together.
As soon as the chocolate/butter mixture is off the heat, crack the eggs into a medium-sized bowl and add the sugar. Use a stand mixer or an electric hand mixer on high speed to start whisking the eggs and sugar until they are at a ribbon stage. The ribbon stage is when the egg and sugar mixture is a pale yellow colour, doubled or even tripled in volume and when you lift the whisk over the mixture, the batter will fall slowly and leave a trail like a ribbon that will hold its shape for a few seconds. It will take about 10 minutes. I still use a timer to make sure I beat them for long enough. Don't start beating the eggs/sugar until the chocolate/butter has melted because the chocolate/butter mixture needs this time to cool down.
When the eggs and sugar have reached a ribbon stage, reduce the speed to low and add the melted chocolate and butter mixture to the eggs and sugar. Whisk until it all appears to have mixed together. If you are using an electric hand mixer, you may need to turn off the mixer, add the chocolate/butter and then switch it back on again to avoid a mess. I speak from experience, haha.
Now fold in the flour and cocoa powder using a spatula, or a spoon until it is well combined.
Pour into the baking tin.
Bake in the oven for 18-20 minutes. They should be firm to touch at the top but still wobble when you shake it. Leave to cool completely in the tin and if you can bear it, cover them and leave them overnight in the fridge. They will be easier to cut and the flavours will have deepened.
*You can add various flavours to this, or not if you want them plain. You can find additional ideas and photos in the original blog entry.
What happened next with that interview? How many points have I accumulated? In this current job hunting cycle, I racked up 103 points. Incidentally, I got offered that job, even without the promise of these brownies and relocated down to the Midlands.
You can find additional photos and ideas in the original blog post by following this link: http://courgettesandlimes.com/2020/09/fudgy-chocolate-brownies/
Join the Conversation
Join the waitlist to share your thoughts and join the conversation.
Han-Na Cha
Han-Na is currently a full-time Academic Development Tutor at UCB and food and poetry blogger. She started blogging as a way to keep notes on how she adapted recipes and then as she grew in confidence, started to develop her own. Food held so many memories, which she realised whilst living in various countries and without realising, her blog became a way to record them for her.
.png)